Hellooo and happy new year! If you guys knew me back in 2016, you'd know that I said that I was a convert of the French method. But as a baker, you always want to improve. However, I've tried a version of the Italian method that I have grown to love and my customers do love it as well. I would love to share with you my updated Italian method recipe, as well as the French which is used in my recently published book (in the next post).
For starters, I will just use the Vanilla Bean Macarons recipe. I have adapted it from Bouchon Bakery's cookbook. If you've ever tried Bouchon Bakery, their macarons are not too sweet, slightly chewy but melts in your mouth. Paired with my delicious, fluffy, and not too sweet new buttercream recipe, it becomes a crowd favorite.
What I do like about this recipe is that it isn't too sweet (personally) and that the shells come out smooth and with smaller feet. They also tend to dry a little faster than the French method. I also have some new tips to add to help speed up your macaron making process, which I will include in another post later. I did not include a recipe for only 1 dozen, because the macarons seems to not turn out as well when I split it up in small batches. The original recipe makes 4 dozen macarons, but I'm sure most don't want to make that many. So I included this recipe for 2 dozen.
So let's get to it!
Showing posts with label recipe. Show all posts
Saturday, January 11, 2020
Thursday, April 7, 2016
Blueberry Cheesecake Macaron Recipe (French Meringue Method)
Hello everyone! Time for another recipe. This one is a highly favorited recipe by some of my customers. If you love blueberries and you love cheesecake, this one's the macaron for you! One of my fave macaron flavors, since it's creamy and not too sweet.
Blueberry Cheesecake Macarons (makes about 12 completed macarons or 24 macaron shells)
Ingredients:
-70g almond flour
-10g Graham Crackers
-2 drops Blueberry Flavoring
-50g powdered sugar
-52g egg whites (doesn't need to be aged)
-52g granulated sugar
1 drop blue food coloring
1 drop purple food coloring
pinch of salt
Crushed graham crackers, for topping
Materials:
-Hand mixer/stand mixer
-Piping bags/tips (#12 Wilton)
-Silpat/parchment (I prefer Silpat)
-Aluminum baking half sheets (Nordic Ware/Costco/Smart and Final)
-Rubber spatula
-Bowls
1. Grind your graham crackers, almond flour, salt, and powdered sugar in a food processor. Then sift together into a large bowl. Add the blueberry flavoring. Set aside.
2. Weigh out your egg whites, and put it in a large bowl (either stand mixer or not).
3. Beat your egg whites until frothy, and slowly add in the granulated sugar.
4. Once sugar dissolves, beat at medium high speed until thick and glossy. It should look a bit droopy but that's fine because when you turn the bowl over, it doesn't come out.
5. Add in 1/3 of your almond powdered sugar mixture and mix until just combined. Add in the rest in small additions and then fold like you normally would (shown in my videos) until thick but still flowing in consistency (like magma). Add in the drops of food coloring at the last second before you put it in the piping bag so it makes a swirl effect.
6. Put it in a piping bag and pipe out 1-1.75 inch circles on a baking sheet lined with parchment or Silpat. Then rap the trays on the table until they are flattened to get rid of air bubbles. If you let them dry too long, they get lopsided.
7. Now is a good time to preheat your oven to 300 F (150 C).
8. Let the macarons dry (with a fan or not) for about 15-20 minutes. When it's almost time to bake them, you can pipe out your next tray.
9. Bake the macarons in the middle rack of your oven for 15 minutes.
10. Let cool for about 10 minutes.
Blueberry Cheesecake Buttercream (makes enough for 1 dozen, plus a little extra)
Ingredients:
-1 stick butter, softened
-1/3 stick cream cheese, softened
-1/4 cup freeze-dried blueberries, ground
-1 tsp vanilla extract
-1/3 cup powdered sugar
1. Beat the butter in your hand/stand mixer for 3-5 minutes, til it is light and fluffy. Then add the powdered sugar.
2. Add in the cream cheese and beat until combined.
3. Add in the ground freeze-dried blueberries until it is a pretty purple color.
4. Sandwich two similar-sized shells together and store in the fridge until ready to eat. :)
I like using freeze-dried fruits in my buttercreams because it doesn't add moisture to the butter and it is so much more concentrated than fresh fruit. People often think contrary, but this is really the best way to get the most flavor.
Enjoy this recipe! <3
Sunday, November 24, 2013
Pistachio Macarons with a Pistachio Custard Buttercream (Italian Meringue Recipe)
Hi guys! I figured this flavor of macaron is the one that really defines your macarons because many places that I've went to who had pistachio macarons did not taste like pistachio at ALL. I've worked pretty hard on this recipe, so enjoy and please credit me :) I just want everyone to taste the true nature of a pistachio macaron. It has a great nutty creamy flavor, with salty elements that keep it from being too sweet. My mom loves them, and she hates sweets. That tells you something. :O
What really irritates me the most is when online bloggers/instagrammers/tumblrers/random people don't give out their recipes. I know damn well that you looked this recipe up on google too ok?! You should be grateful to people who give out recipes. I had to take an $80 class to learn this sort of recipe, but I kept modifying it to my standards and tastes. It was similar to notsohumblepie's recipe, except for a few slight sugar reductions. Listen, if you're not a worldwide business and you are just a home cook, why the hell not would you give out the recipe? You damn well got it from someone else. If no one gave out recipes, then no one would know how to cook at home. Ok. end rant. On to the recipe :)
Pistachio Macarons with a Pistachio Custard Buttercream (Italian Meringue Recipe), makes about 24 completed macarons or 48 shells
Ingredients:
Mass:
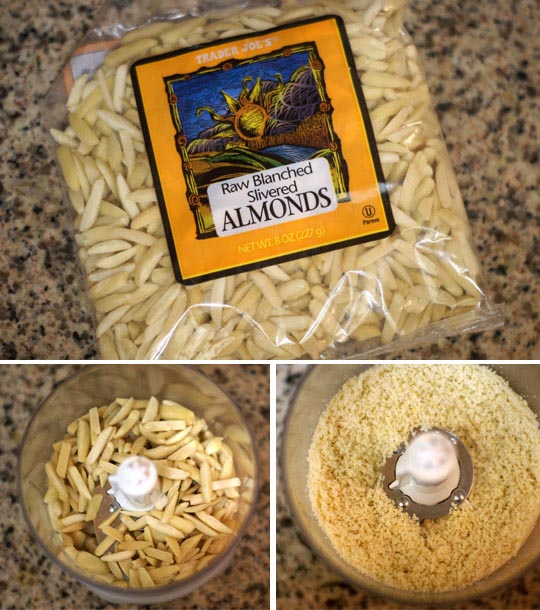
-120g almond meal/flour (I use Trader Joe's Blanched Slivered Almonds and grind them in a food processor)
-30g shelled pistachios
-150g powdered sugar
-50g egg whites (do not have to be aged)
-Gel food coloring (optional)
-2 tsp cornstarch (if weather is humid)
-pinch of salt
-1/3 cup ground shelled pistachios, for sprinkling (optional)
Italian Meringue:
-120g granulated sugar
-55g egg whites (do not have to be aged)
-40g water
Materials:
-Candy thermometer
-Kitchen/postal scale
-Piping bags/large round tip (These give the most perfect results if that's what you're going for)
-Good insulated baking sheets (I use Nordic Ware Baker's Half Sheet)
-Parchment paper or silpats (I prefer silpats but parchment is nice too)
-Stand mixer (recommended, but it is possible with a hand mixer, just takes longer)
-Rubber Spatula/pastry scraper
1. Process together your almond flour, pistachios, and powdered sugar in a food processor until finely ground. Sift together into a large bowl.
2. Add the 50g egg whites and mix until it becomes a dough-like consistency, and add in your food coloring. Cover with plastic wrap and set aside. (or you can do this after your meringue is made so you don't have to put plastic wrap over it)
3. For the meringue, beat your 55g egg whites in the bowl of your stand mixer until frothy, then add a pinch of sugar if you'd like to stabilize the egg whites. Beat until soft peaks form, then turn the mixer down to low or 'stir' so that they don't deflate. DO NOT OVERBEAT EGG WHITES AT THIS STAGE. VERY IMPORTANT...if you do, your macarons will be hollow.
4. At the same time, put the water and sugar in a small saucepan over the stove at medium-high heat and attach your candy thermometer. When the mixture gets bubbly with no spots of unboiled sugar or 240 degrees Fahrenheit on your candy thermometer, take the sugar syrup off heat and slowly pour it into the egg whites, while turning up your mixer to medium-high speed. Let it beat until the bowl of the stand mixer is body temperature, and holds a nice 'beak'. The meringue should be stiff, shiny, and smooth.
5. Then add 1/3 of the meringue to the mass just to lighten it up, making it easier to fold into the meringue. Fold with a rubber spatula just a bit until no white spots are showing. Keep folding until the batter is thick but still flowing.
7. Once the batter will fall of the spatula with a thick ribbon-like consistency, you are ready to pipe them. Pipe 1-1.5 inch diameter circles onto baking sheets lined with parchment paper or Silpat. Now is a good time to preheat your oven to 300 degrees Fahrenheit.
8. Once you are done piping, drop the sheets a couple times on the counter to get rid of air bubbles and flatten out any peaks on your macarons.
9. Now let them rest for 15-20 minutes, or until the macarons are dry to the touch.
10. Bake for 10-13 minutes, depending on how solid you want your macarons. I recommend 12. Also only bake one tray at a time so that it is baked with even heat.
11. Let them cool completely before taking them off the baking sheets with an offset spatula.

Pistachio Custard Buttercream
Ingredients:
-2 egg yolks
-1/3 cup sugar
-7 tbsp milk
-7 tbsp butter
-1 1/2 tsp almond extract-1/3 cup ground shelled pistachios
1. Whisk egg yolks and sugar together in a small saucepan.
2. Add the milk and whisk to combine.
3. Turn on the stove over medium-low heat and cook until thick while stirring continuously.
4. After it thickens, strain the mixture through a sieve to catch any curdled egg yolk and transfer to a mixing bowl. Let it cool down to room temperature.
5. In the meantime, grind your pistachios in a food processor pretty finely almost like a powder.
6. Once egg mixture is cooled, beat in your softened butter, pistachios, and almond extract until smooth.
7. Now sandwich similar sized shells together and store in the fridge at least 24 hours so that the flavors meld and softens up the shell a bit. Serve at room temperature for a better taste experience.
I really enjoy this macaron! It definitely tastes like pistachio, and of course you can tell it is a pistachio macaron because of the pistachios on top and in the filling. I just hate when macarons don't taste like what it's supposed to. :( This is probably my most popular flavor among my customers :)
Thursday, September 19, 2013
Red Velvet Macarons With a Cream Cheese Filling
Hi everyone! I think it's about time I bless you guys with a new recipe. LOL just kidding. But yes I will share a recipe today since it's been awhile.
I seen a lot of red velvet recipes online but they don't really seem to have that 'red velvet'-esque flavor. Probably due to too little cocoa powder or not enough cream cheese. I think mine is pretty good now that I've tweaked it a bit. Before when I was testing out this recipe, someone thought it was too buttery. So I cut down the butter and added more tangy cream cheese and just the perfect amount of sweetness. Hope you enjoy :) (P.S.: Usually I take a picture out of a bite of the macaron, but these were for an order so I didn't want to waste one. I will put one up eventually!)
Red Velvet Macarons with a Cream Cheese Filling (Italian Meringue Recipe), makes about 24 completed macarons or 48 shells
Ingredients:
Mass:
-150g almond meal/flour (I use Trader Joe's Blanched Slivered Almonds and grind them in a food processor)
-145g powdered sugar
-5g cocoa powder (usually more than that makes it hollow and wet inside)
-50g egg whites (do not have to be aged)
-Gel food coloring (optional)
-2 tsp cornstarch (if weather is humid)
-pinch of salt
Italian Meringue:
-120g granulated sugar
-55g egg whites (do not have to be aged)
-40g water
Materials:
-Candy thermometer
-Kitchen/postal scale
-Piping bags/large round tip (These give the most perfect results if that's what you're going for)
-Good insulated baking sheets (I use Nordic Ware Baker's Half Sheet)
-Parchment paper or silpats (I prefer silpats but parchment is nice too)
-Stand mixer (recommended, but it is possible with a hand mixer, just takes longer)
-Rubber Spatula/pastry scraper
1. Process together your almond flour, cocoa powder, and powdered sugar in a food processor until finely ground. Sift together into a large bowl.
2. Add the 50g egg whites and mix until it becomes a dough-like consistency, and add in your food coloring. Cover with plastic wrap and set aside.
3. For the meringue, beat your 55g egg whites in the bowl of your stand mixer until frothy, then add a pinch of sugar if you'd like to stabilize the egg whites. Beat until soft peaks form, then turn the mixer down to low or 'stir' so that they don't deflate. DO NOT OVERBEAT EGG WHITES AT THIS STAGE. VERY IMPORTANT...if you do, your macarons will be hollow.
4. At the same time, put the water and sugar in a small saucepan over the stove at medium-high heat and attach your candy thermometer. When the mixture gets bubbly with no spots of unboiled sugar or 240 degrees Fahrenheit on your candy thermometer, take the sugar syrup off heat and slowly pour it into the egg whites, while turning up your mixer to medium-high speed. Let it beat until the bowl of the stand mixer is body temperature, and holds a nice 'beak'. The meringue should be stiff, shiny, and smooth.
5. Then add 1/3 of the meringue to the mass just to lighten it up, making it easier to fold into the meringue. Fold with a rubber spatula just a bit until no white shows. Keep folding until the batter is thick but still flowing.
7. Once the batter will fall of the spatula with a thick ribbon-like consistency, you are ready to pipe them. Pipe 1-1.5 inch diameter circles onto baking sheets lined with parchment paper or Silpat. Now is a good time to preheat your oven to 300 degrees Fahrenheit.
8. Once you are done piping, drop the sheets a couple times on the counter to get rid of air bubbles and flatten out any peaks on your macarons.
9. Now let them rest for 15-20 minutes, or until the macarons are dry to the touch.
10. Bake for 10-13 minutes, depending on how solid you want your macarons. I recommend 12. Also only bake one tray at a time so that it is baked with even heat.
11. Let them cool completely before taking them off the baking sheets with an offset spatula.
I seen a lot of red velvet recipes online but they don't really seem to have that 'red velvet'-esque flavor. Probably due to too little cocoa powder or not enough cream cheese. I think mine is pretty good now that I've tweaked it a bit. Before when I was testing out this recipe, someone thought it was too buttery. So I cut down the butter and added more tangy cream cheese and just the perfect amount of sweetness. Hope you enjoy :) (P.S.: Usually I take a picture out of a bite of the macaron, but these were for an order so I didn't want to waste one. I will put one up eventually!)
Red Velvet Macarons with a Cream Cheese Filling (Italian Meringue Recipe), makes about 24 completed macarons or 48 shells
Ingredients:
Mass:
-150g almond meal/flour (I use Trader Joe's Blanched Slivered Almonds and grind them in a food processor)
-145g powdered sugar
-5g cocoa powder (usually more than that makes it hollow and wet inside)
-50g egg whites (do not have to be aged)
-Gel food coloring (optional)
-2 tsp cornstarch (if weather is humid)
-pinch of salt
Italian Meringue:
-120g granulated sugar
-55g egg whites (do not have to be aged)
-40g water
Materials:
-Candy thermometer
-Kitchen/postal scale
-Piping bags/large round tip (These give the most perfect results if that's what you're going for)
-Good insulated baking sheets (I use Nordic Ware Baker's Half Sheet)
-Parchment paper or silpats (I prefer silpats but parchment is nice too)
-Stand mixer (recommended, but it is possible with a hand mixer, just takes longer)
-Rubber Spatula/pastry scraper
1. Process together your almond flour, cocoa powder, and powdered sugar in a food processor until finely ground. Sift together into a large bowl.
2. Add the 50g egg whites and mix until it becomes a dough-like consistency, and add in your food coloring. Cover with plastic wrap and set aside.
3. For the meringue, beat your 55g egg whites in the bowl of your stand mixer until frothy, then add a pinch of sugar if you'd like to stabilize the egg whites. Beat until soft peaks form, then turn the mixer down to low or 'stir' so that they don't deflate. DO NOT OVERBEAT EGG WHITES AT THIS STAGE. VERY IMPORTANT...if you do, your macarons will be hollow.
4. At the same time, put the water and sugar in a small saucepan over the stove at medium-high heat and attach your candy thermometer. When the mixture gets bubbly with no spots of unboiled sugar or 240 degrees Fahrenheit on your candy thermometer, take the sugar syrup off heat and slowly pour it into the egg whites, while turning up your mixer to medium-high speed. Let it beat until the bowl of the stand mixer is body temperature, and holds a nice 'beak'. The meringue should be stiff, shiny, and smooth.
5. Then add 1/3 of the meringue to the mass just to lighten it up, making it easier to fold into the meringue. Fold with a rubber spatula just a bit until no white shows. Keep folding until the batter is thick but still flowing.
7. Once the batter will fall of the spatula with a thick ribbon-like consistency, you are ready to pipe them. Pipe 1-1.5 inch diameter circles onto baking sheets lined with parchment paper or Silpat. Now is a good time to preheat your oven to 300 degrees Fahrenheit.
8. Once you are done piping, drop the sheets a couple times on the counter to get rid of air bubbles and flatten out any peaks on your macarons.
9. Now let them rest for 15-20 minutes, or until the macarons are dry to the touch.
10. Bake for 10-13 minutes, depending on how solid you want your macarons. I recommend 12. Also only bake one tray at a time so that it is baked with even heat.
11. Let them cool completely before taking them off the baking sheets with an offset spatula.
Cream Cheese Filling
Ingredients:
-8 oz cream cheese
-very small amount of butter (1-2 tbsp)
-About 3/4 cup powdered sugar (to taste)
-1 1/2 tsp vanilla extract
1. Whip cream cheese and butter together with an electric mixer until light and fluffy.
2. Add in the powdered sugar and vanilla extract.
3. Put into a piping bag and pipe a good amount of filling onto one macaron shell and sandwich together.
4. Store in the fridge for at least 24 hours for a better taste experience (flavors meld and softens the shell a bit) and serve at room temperature.
Sunday, May 12, 2013
Macaron Recipe Video!
Hi everyone, I have finally got around to making a video tutorial for macarons!:) So please enjoy and hope this helps you.
Subscribe to:
Posts (Atom)