Showing posts with label pictures. Show all posts

Sunday, March 10, 2013

Macaron Recipe (Italian Meringue Method) Part Two

I have been doing some experimenting in my kitchen with a few things, and also a new recipe. I still wish you can reduce the sugar in macarons, but I suppose you can't. It affects their structures too much. What a fussy little cookie. I still prefer the Italian meringue method because it is less fussy than the French one, and always produces feet with my recipe. Anyways, here is my new macaron recipe (with pictures!:o) and I wish you good luck.


Macaron Recipe (Italian Meringue Method) makes about 24 macarons, or 48 shells


Ingredients:
Mass:
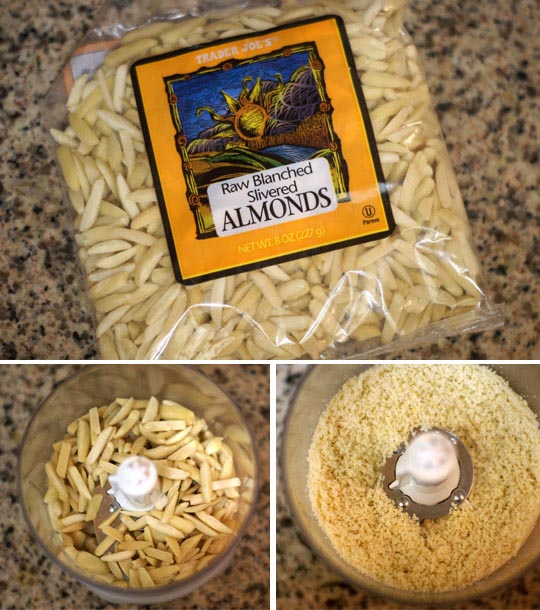
-150g almond meal/flour (I use Trader Joe's Blanched Slivered Almonds and grind them in a food processor)
-150g powdered sugar
-50g egg whites (do not have to be aged)
-Gel food coloring (optional)
-2 tsp cornstarch (if weather is humid)
-pinch of salt

Italian Meringue:
-120g granulated sugar
-55g egg whites (do not have to be aged)
-40g water

Materials:
-Candy thermometer
-Kitchen/postal scale
-Piping bags/large round tip (These give the most perfect results if that's what you're going for)
-Good insulated baking sheets (I use Nordic Ware Baker's Half Sheet)
-Parchment paper or silpats (I prefer silpats but parchment is nice too)
-Stand mixer (recommended, but it is possible with a hand mixer, just takes longer)


Sift almond meal and powdered sugar together into a large bowl. Add the 50g egg whites and mix until it becomes a dough-like consistency. (This is the time to add food coloring, remember the meringue will lighten the color of the mass)


Set aside and cover with plastic wrap so it doesn't harden.

For the meringue, beat egg whites in the bowl of your stand mixer until soft peaks form. DO NOT overbeat egg whites at this stage. After they have formed, turn down your mixer to "stir" or very low to keep them moving so they don't deflate.

At the same time, put the water and sugar on the stove over medium-high heat and attach your candy thermometer. When the mixture gets bubbly all around with no spots of unboiled water (or 240 degrees F) pour the sugar syrup into the egg whites and turn up the speed of your mixer to high. Let it beat until the bowl of the mixer is warm to the touch (body temperature). It should look like this:

Shiny, stiff, and smooth.

Then, add 1/3 of the meringue to the mass and fold until you cannot see any more white streaks of meringue. After you have lightened the mass, add the rest of the egg whites and fold.


The way you fold is crucial to how your macarons turn out. Here I have made a video of how to fold. It is a fold, press, turn motion.

Now you are ready to pipe them with your piping bag into 1-1.5 inch diameter circles, however big you like. I pipe them onto a parchment paper-lined or silpat-lined aluminum baking sheet. I usually fit about 20-24 circles on each pan.


Then drop your baking sheets about 2-3 times until they flatten out and the air bubbles pop. If you still see any, pop them with a toothpick. Now let them dry about 20-30 minutes or until they are dry to the touch (depends on humidity). While you're waiting, preheat your oven to 300 degrees Fahrenheit  Check your oven to make sure it's the correct temperature! Sometimes the oven lies. lol

Dull and dry, ready for the oven!

Now bake them for 10-13 minutes, or even longer if they are still too moist inside. Bake only one tray at a time if your oven has inconsistent heat. Let them cool completely before you take them off the parchment/silpat.


Sandwich together with a filling (my favorite is Swiss Meringue Buttercream) and you're done! Store filled shells in an airtight container in the fridge for at least 24 hours. This helps the shell meld together with the filling, making it a bit crisp on the outside but melt-in-your-mouth on the inside. :)

Nice and fluffy on the inside :3

The beauty of this recipe is that you can split it in half or thirds! For the meringue though, you need to weigh out 55g of meringue for 1/3 batch, and 80g meringue for 1/2 batch. For example,

75g almond meal/flour
75g powdered sugar
25g egg whites

You would make the meringue as usual and then weigh out 80g of it and proceed with the rest of the recipe. With the leftover meringue, you can make Italian Meringue Buttercream :)

Hope this helps!:)


Saturday, February 16, 2013

I've found the secret to not-hollow macarons ;D

Hi all! I am pretty sure all of you have had trouble with macarons...especially with the outsides looking all pretty, but the insides looking terrible and ghastly, like there is nothing inside (aka hollow). I've had that problem quite a few times, and it makes me mad! However, I recently took a professional macaron class, and now I have to say that I have no more hollows. :) See?
Red Velvet Macarons with a cream cheese filling & Mango Macarons with a Mango Swiss Meringue Buttercream

These were for 3 recent orders I had for Valentine's Day. I let my boyfriend try the mango one, and he LOVED it. He said the texture was perfect, and it melted in your mouth with a good amount of mango flavor. 

Previously, most of my macarons in the past when I began making them were quite hollow, or had large air pockets. In many tutorials on youtube, they do not show you how to incorporate the tant pour tant with the meringue correctly. My macaron teacher showed us how to correctly fold it so that there is no excess air in the batter. You fold the batter, scratch the bottom of the bowl a few times, and then turn the bowl to get better leverage over the whole batter. You repeat this a couple of times until you get batter that still has shape, yet flows very well like a liquid. If you tilt the bowl, it should flow down to that side with ease, but not with too much ease that it looks like water. If you pipe them out, they should slowly go down to a flat circle, not a big lump. Here is a comparison: 


This one is undermixed..a bit lumpy and doesn't flatten.

This one is perfect! Nice, flat, circles that do not spread too much.

After proceeding with this important step, make sure that you pop all the air bubbles you see after dropping the pans with a toothpick. 

One crucial item I bought recently was an oven thermometer! Seriously, you can't trust what your oven tells you...like that one friend you think is telling the truth, but is really screwing you over....

Anyways, I always preheated my oven to 300 degrees...as so it says on my oven. However, the macarons would always seem to deflate a lot when I took them out. Then I got the idea of "Hmm, maybe I should turn up the temperature and see if that helps". So I turned it up to 310, and voila! There were no hollows! What a difference 10 degrees makes. When I put my new oven thermometer in the oven and preheated it to 300 degrees, I noticed that the thermometer read somewhere between 270-280 degrees!!! That's not right at all. WAYY too low for the macarons' structure to set, and probably that's what caused all the fluffy yummy goodness of the interiors to fall to the bottom of the shells, making the shells as light as air. So this time I turned up the temperature to 305, and it came out with better shells, yet still some air pockets. I turned it up to 310, and the shells were perfect. Not browned on the tops at all! The temperature on the oven thermometer actually read 300 degrees this time. Oven temperature is a BIG BIG factor in determining how your macarons come out. 

Another trick that I learned in macaron class was to use an offset spatula to scrape all the macarons off the Silpat at one time. It saves you a lot of time, and destroyed shells. I used to have to pick them off with my hands, but that would sometimes end up with their little bottoms still on the Silpat. You just basically scrape through them and they come off cleanly!:) 

I also learned that you should rest the batter until they are firm to the touch. Not SLIGHTLY firm, but FIRM. If it's slightly firm, it still may crack in the oven. The best way to achieive this is a fan!:) And if you are baking on not-so-good quality baking sheets (like thin ones you buy at Ross) you should double-stack them. But if you are using good quality aluminum pans like Nordic Ware, no need to double stack!

Well, hope I helped you with some tips. I should post my own pictures sometime...haha


Saturday, January 12, 2013

Cookie Monster Macarons!! With a cookie dough buttercream filling.

These are probably my favorite macarons thus far. So yummy and cute! Above is a series of pictures that explain how I make macarons. :)

Top from left:


  • Boiling the sugar syrup to 250 degrees Fahrenheit
  • Finished Italian Meringue; stiff, shiny, glossy, marshmallowy
  • Tant pour tant with food coloring (almond flour/powdered sugar/egg whites)
  • Mixing the meringue with the tant pour tant
  • Finished macaronage
  • Freshly piped circles
  • Macarons that are ready to go in the oven (duller surface and not sticky)
  • Macarons baking
  • Finished macaron 
Although I love the flavor of these macarons, I think the feet are a tad bit small for some odd reason :( I looked it up online and there's no explanation. I suppose I either overmixed it or I banged it on the table too hard and knocked the air out of them. Oops. At least they're not completely hollow :)