
Oh delicious, autumn-y pumpkin. I love pumpkin, I actually used to think it tasted weird as a kid but now I have grown to love it. The yumminess of this macaron comes from the spices and real pumpkin used in the filling. I used to only make pumpkin spice without any pumpkin but I feel it's better to put the real thing in it. So here is my recipe, I kinda winged it on the filling...so probably just use a swiss buttercream or even better, an egg yolk or cooked frosting. I'll give you three options at the end :P
Pumpkin Pie Macarons with a Pumpkin Butter Filling (Italian Meringue Recipe), makes about 24 completed macarons or 48 shells
Ingredients:
Mass:
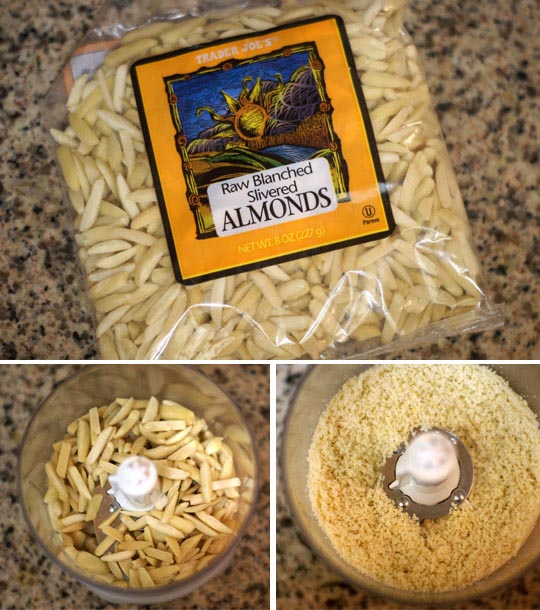
-150g almond meal/flour (I use Trader Joe's Blanched Slivered Almonds and grind them in a food processor)
-145g powdered sugar
-5g pumpkin spice
-50g egg whites (do not have to be aged)
-Gel food coloring (optional)
-2 tsp cornstarch (if weather is humid)
-pinch of salt
Italian Meringue:
-120g granulated sugar
-55g egg whites (do not have to be aged)
-40g water
Materials:
-Candy thermometer
-Kitchen/postal scale
-Piping bags/large round tip (These give the most perfect results if that's what you're going for)
-Good insulated baking sheets (I use Nordic Ware Baker's Half Sheet)
-Parchment paper or silpats (I prefer silpats but parchment is nice too)
-Stand mixer (recommended, but it is possible with a hand mixer, just takes longer)
-Rubber Spatula/pastry scraper
1. Process together your almond flour, pumpkin spice, and powdered sugar in a food processor until finely ground. Sift together into a large bowl.
2. Add the 50g egg whites and mix until it becomes a dough-like consistency, and add in your food coloring. Cover with plastic wrap and set aside.
3. For the meringue, beat your 55g egg whites in the bowl of your stand mixer until frothy, then add a pinch of sugar if you'd like to stabilize the egg whites. Beat until soft peaks form, then turn the mixer down to low or 'stir' so that they don't deflate. DO NOT OVERBEAT EGG WHITES AT THIS STAGE. VERY IMPORTANT...if you do, your macarons will be hollow.
4. At the same time, put the water and sugar in a small saucepan over the stove at medium-high heat and attach your candy thermometer. When the mixture gets bubbly with no spots of unboiled sugar or 240 degrees Fahrenheit on your candy thermometer, take the sugar syrup off heat and slowly pour it into the egg whites, while turning up your mixer to medium-high speed. Let it beat until the bowl of the stand mixer is body temperature, and holds a nice 'beak'. The meringue should be stiff, shiny, and smooth.
5. Then add 1/3 of the meringue to the mass just to lighten it up, making it easier to fold into the meringue. Fold with a rubber spatula just a bit until no white spots are showing.
7. Once the batter will fall of the spatula with a thick ribbon-like consistency, you are ready to pipe them. Pipe 1-1.5 inch diameter circles onto baking sheets lined with parchment paper or Silpat. Now is a good time to preheat your oven to 300 degrees Fahrenheit.
8. Once you are done piping, drop the sheets a couple times on the counter to get rid of air bubbles and flatten out any peaks on your macarons.
9. Now let them rest for 15-20 minutes, or until the macarons are dry to the touch.
10. Bake for 10-13 minutes, depending on how solid you want your macarons. I recommend 12. Also only bake one tray at a time so that it is baked with even heat.
11. Let them cool completely before taking them off the baking sheets with an offset spatula.
Pumpkin Butter Filling (Version 1 Swiss Meringue Buttercream)
Ingredients:
-2 egg whites
-1/3 cup sugar
-1/3 cup sugar
-1/2 cup butter (1 stick)
-1/3 cup pumpkin butter/puree
-1-2 tbsp pumpkin spice
-1-2 tbsp flour (optional)

2. Add the egg whites and granulated sugar into the smaller bowl, and whisk constantly to prevent mixture from cooking.
3. Once the mixture reaches 140 degrees Fahrenheit on your thermometer or if you put your fingers in the mixture and rub them together, no sugar crystals remain, take it off heat.
4. With a hand or stand mixer, beat the egg whites until they become thick and white.
5. Now add in your butter a stick at a time (if it is not softened, heat it up in microwave for 8 seconds). Beat for about 2 minutes, or until the buttercream has become a light and fluffy texture. It may look curdled while beating, but keep beating until it becomes smooth.
6. Add in your pumpkin puree and spice until smooth. If too runny, add some flour (like 1-2 tbsp) to soak up the excess moisture.
7. Now sandwich similar sized shells together and store in the fridge for at least 24 hours, so that the flavors meld and it softens up the shell a bit. Serve a room temperature for a better taste experience.
Pumpkin Butter Filling (Version 2 Egg Yolk/Milk Buttercream) - adapted from Yoo Eatz
Ingredients:
-2 egg yolks
-1/3 cup sugar
-7 tbsp milk
-7 tbsp butter
-1/4 cup pumpkin butter/puree
-1-2 tbsp pumpkin spice
1. Cream egg yolks and sugar together until light in color in a small saucepan.
2. Add in the milk and whisk until well combined.
3. Turn on the burner and cook egg yolk, sugar, and milk mixture until thick in consistency.
4. Strain mixture through a sieve to catch any cooked/curdled egg yolk and let it cool to room temperature.
5. Add in your softened butter (if not softened, heat it up in microwave for 8 seconds) and beat until smooth.
6. Add in your pumpkin butter/puree and spice and beat until desired texture.
7. Now sandwich similar sized shells together and store in the fridge at least 24 hours so that the flavors meld and softens up the shell a bit. Serve at room temperature for a better taste experience.
Pumpkin Butter Filling (Version 3 Cooked Frosting) - adapted from yoyomax12
Ingredients:
-4 tbsp flour
-1/2 cup milk
-1/2 cup finely ground sugar
-1/2 cup butter
-1/4 cup pumpkin butter/puree
-1-2 tbsp pumpkin spice
1. Cook milk and flour in a saucepan until it is like a thick paste.
2. While the paste is cooling, beat butter and sugar for 4 minutes until light and fluffy.
3. When flour paste is cooled, add it into butter sugar mixture and beat for another 4 minutes until consistency desired.
4. Add in your pumpkin butter/puree and spice and beat until satisfied.
5. Now sandwich similar sized shells together and store in the fridge at least 24 hours so that the flavors meld and softens up the shell a bit. Serve at room temperature for a better taste experience.
Hi Natalie. I have questions for you I already read your FAQ and it is helpful, but I made 3 batches of macarons and only one batch came out correct. Can I email you the pictures I took? Maybe if you see them you can tell me what went wrong. Thanks
ReplyDeleteHello, sure go ahead and email me at nataliewongg@yahoo.com :)
DeleteThank you :) I sent you an email just now.
DeleteAWESOME! Thank you so much for posting this :) I'm going to definitely try this out :D
ReplyDeletelet me know how it goes :D
DeleteHi Natalie, for the egg yolk buttercream, can I make other flavors out of it? Thank You :)
ReplyDeleteHi Anne, yes you can make other flavors out of it! It's delicious too :D
DeleteSo.... if I were to make a chocolate flavored one....... would I just add in cocoa powder?
DeleteThank You :)))
Yes you can add cocoa powder or melted chocolate :)
DeleteHello! I just found your blog when I was googling how to freeze macarons. My daughter and I have made them before and she requested them as our Thanksgiving dessert contribution. I've never made them in advance and frozen them before; they always get eaten immediately.
ReplyDeleteOne blog I read said that if you're using jam as the filling, the shells should be frozen alone and then assembled after defrosting because the jam makes the shells too soft when they defrost all together. What do you think? I'm planning on some batches with buttercream filling and some with jam filling and trying to figure out the most efficient way to do so many.
Thanks! I'll be following your blog!
Hello, yes that is true you should freeze the shells alone when you use jam or else they get really mushy. But for buttercream with not much moisture content it's fine :)
DeleteFollowed your Italian meringue method and finally, no hollows in the shells. Brought tears to my eyes. Thank you for the tips- the Italian method is clearly the superior method. Your tips on mixing the batter and drying with a fan was hugely helpful as well.
ReplyDeletegood job :D i'm happy for you! haha yeah I love the Italian method it's so much more reliable. :)
DeleteYour recipe is SO easy to follow but Im having trouble with my macarons. They are SO hollow and idk what i did wrong.. Ive let them until they dont stick to my finger. I whipped the eggs until its glossy and soft peaks. One thing I may have missed is what temperature to put the oven on? Can i please send you a picture and hope that you could help ? (:
ReplyDeleteHello Jennifer!
DeleteAre you sure you whipped the egg whites stiff enough? if it's too droopy then beat it a little more. And its 300 F or 150 C. I have pictures on my main recipe. http://loveandmacarons.blogspot.com/2013/03/macaron-recipe-italian-meringue-method.html
Love your blog! I've been using your recipe and it's a miracle! All my batches came out perfect.. I have a new dilemma now and wonder if you can help? I just switch from parchment paper to Artisan silicone mat. Parchment paper works fine and my macarons all came out with perfect feet but it's just not as uniform. I've been experimenting with my new silicone mat and noticed all my macarons are lipsided. I've tried everything.. From lowering my temps from 290 F to 285 F and baking from 14-16 minutes. My ideal temps using parchment paper is 290 F for 14-16 min, I have to lower my time bc my oven gets hotter at the end. What am I doing wrong.. Please help! 😭😭
ReplyDeleteSorry I mean *** lopsided (iPhone auto correct sucks)
ReplyDelete